Chapter 4 GitHub
I would like to edit and update this. It is a direct clone from the OHI Training Workbook at the moment.
4.1 Objectives
After today you will be able to start incorporating GitHub into your workflow.
This will change you life (for the better!)
Github was developed for social coding (i.e., sort of like an open source Wikipedia for programmers). Consequently, much of the functionality and terminology of Github (e.g., branches and pull requests) will not be relevant for most scientists.
We will skip over all this stuff!
To get the full functionality of Github, you will eventually want to learn other concepts.
But, this can wait.
Basically, we have figured out exactly what you need to know to get started!
4.2 What are Git and Github?
Git and GitHub are two distinct programs, but I think of them as a bundle because I always use them together.
Git is a version control system that lets you track changes to files over time.
Github is a website for storing your git versioned files remotely. It has many nice features to be able visualize differences between images, rendering & diffing map data files, render text data files, and track changes in text.
4.3 Why should scientists use GitHub?
- Ends (or, nearly ends) the horror of keeping track of versions.
Basically, we get away from this:
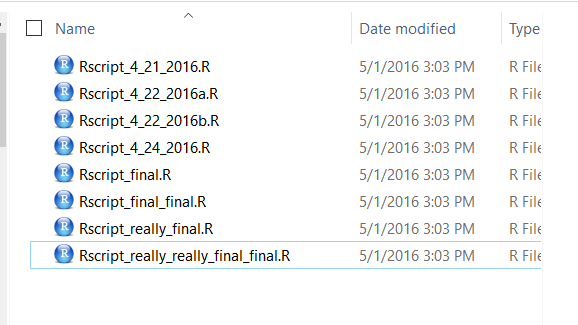
When you open your repository, you only see the most recent version. But, it easy to compare versions, and you can easily revert to previous versions.
- Provides peace of mind because you make changes to your work…and know that you can easily access earlier versions.
- Improves collaborative efforts. Different researchers can work on the same files at the same time!
- It is easy to share and distribute files through the Github website.
- Your files are available anywhere, you just need internet connection!
We’ll interface with GitHub from our local computers using RStudio because it works well with the R/RStudio workflow. But, there are many other ways to interact with GitHub, including GitHub’s Desktop App or the command line (here is Jenny Bryan’s list of git clients).
At some point you will need to use the command line to interface with Git, but this isn’t necessary for starting. There are great resources for learning the command line, check out this tutorial from SWC at UCSB.
4.4 Resources
These are materials we borrow from:
- Jenny Bryan’s lectures from STAT545 at UBC: The Shell
- Jenny Bryan’s Happy git with R tutorial
- Melanie Frazier’s GitHub Quickstart
- Ben Best’s Software Carpentry at UCSB
4.5 Let’s get started
4.5.1 Some Github terminology
- User: A Github account for you (e.g., jules32).
- Organization: The Github account for one or more user (e.g., datacarpentry).
- Repository: A folder within the organization that includes files dedicated to a project.
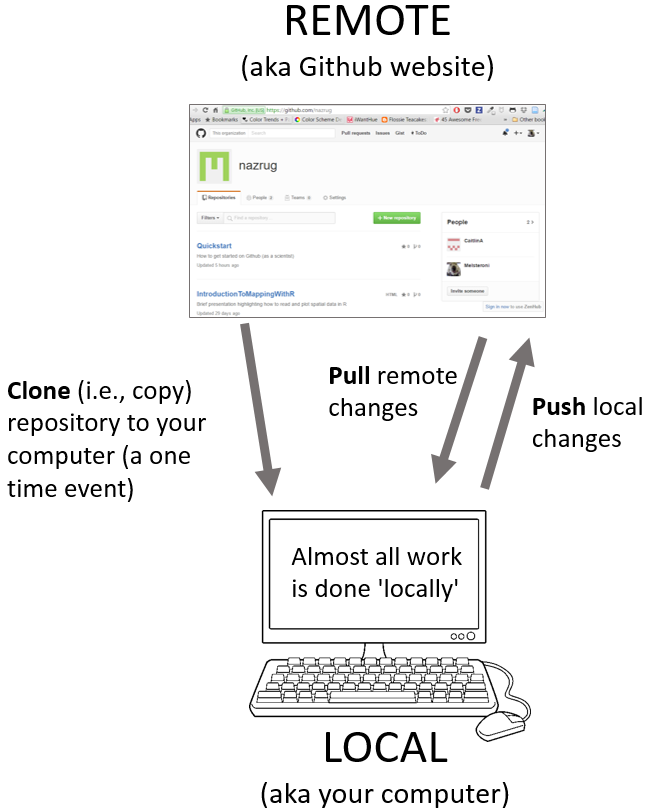
- Local Github: Copies of Github files located your computer.
- Remote Github: Github files located on the https://github.com website.
- Clone: Process of making a local copy of a remote Github repository. This only needs to be done once (unless you mess up your local copy).
- Pull: Copy changes on the remote Github repository to your local Github repository. This is useful if multiple people are making changes to a repository.
- Push: Save local changes to remote Github
After we set up git on your computers, we’ll explore the full GitHub process:
- create a repository on GitHub.com
- clone locally using RStudio
- learn the RStudio-GitHub workflow by syncing to Github.com: pull, stage, commit, push
- explore github.com: files, commit history, file history
- practice the RStudio-GitHub workflow by editing and adding files
- practice R Markdown
4.5.2 Setup Git & GitHub
The GitHub setup is a one-time thing! You will only have to do this once per computer. We’ll walk through this together.
NOTE: If you are a student you can get the micro account which includes 5 private repositories for free (normally a $7/month value). You can sign up for the student account here. Instructors can also request a free organization account, “Request a discount”.
Download and install Git (https://git-scm.com/downloads)
Create a Github account at http://github.com, if you don’t already have one. For a username, I recommend all lower-case letters, short as you can. I recommend using your .edu email, since you can request free private repositories via GitHub Education discount.
You will use the
usethispackage to configure git with global commands, which means it will apply ‘globally’ to all files on your computer, rather than to a specific folder.
install.packages("usethis")
library(usethis)

use_git_config(user.name = "Melsteroni", user.email = "Melsteroni@example.org")
BACKUP PLAN If usethis fails, the following is the classic approach to configuring git. Open the Git Bash program (Windows) or the Terminal (Mac) and type the following:
    # display your version of git
    git --version

    # replace USER with your Github user account
    git config --global user.name USER

    # replace NAME@EMAIL.EDU with the email you used to register with Github
    git config --global user.email NAME@EMAIL.EDU

    # list your config to confirm user.* variables set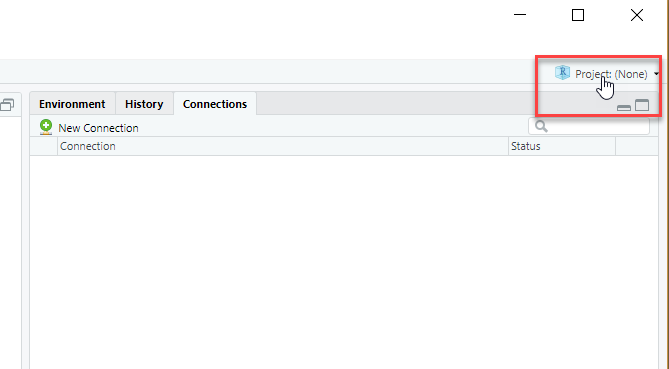
git config --list- Make sure Git and RStudio are tallking: Click on “Project (None)” on the top right –> “New Project” –> “Version Control” –> Git
Do any ominous messages pop up?
4.5.2.1 Troubleshooting
If you have problems setting up git, please see the Troubleshooting section in Jenny Bryan’s amazing HappyGitWithR.
New(ish) Error on a Mac We’ve also seen the following errors from RStudio:
error key does not contain a section --global terminaland
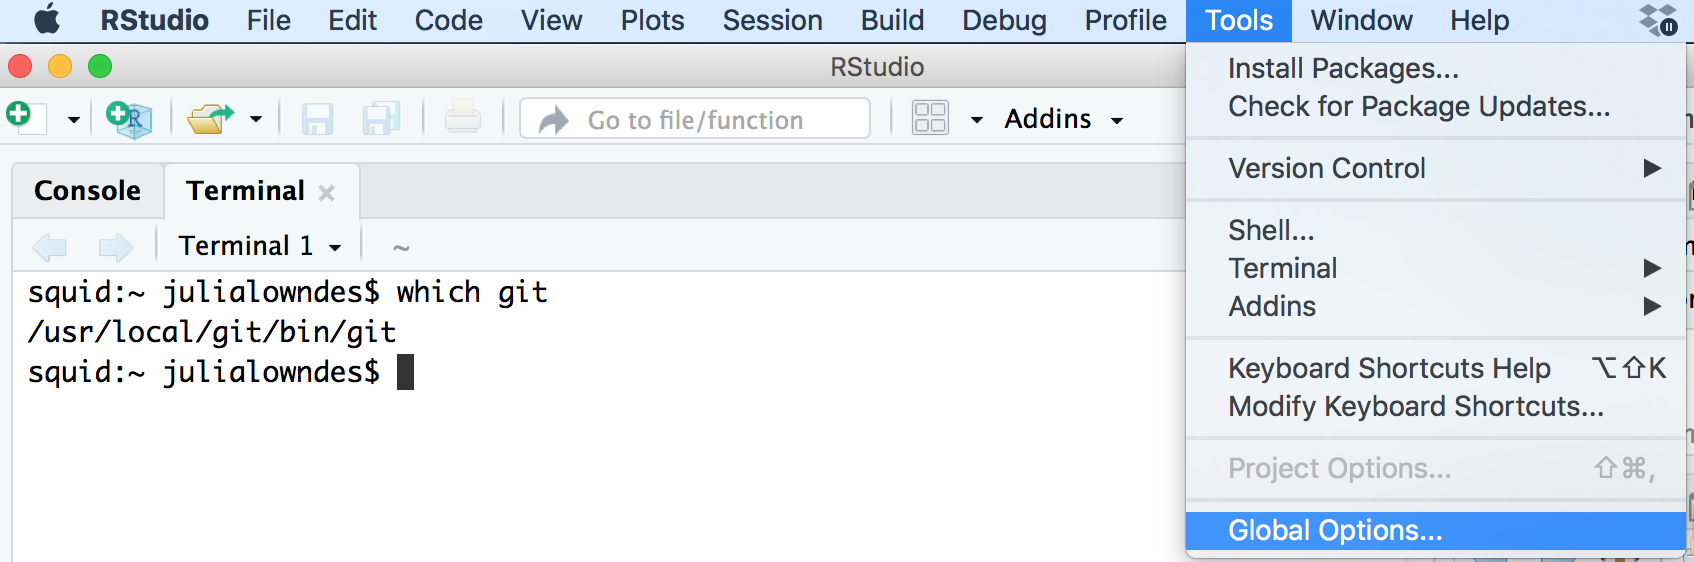
fatal: not in a git directoryTo solve this, go to the Terminal and type:
which git
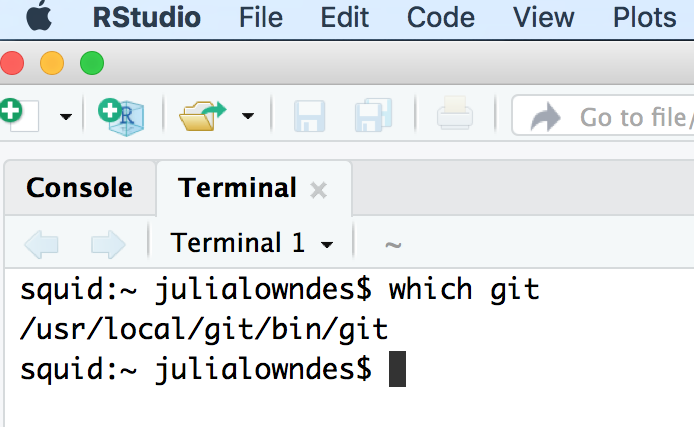
Look at the filepath that is returned. Does it say anything to do with Apple?
-> If yes, then the Git you downloaded isn’t installed, please redownload if necessary, and follow instructions to install.
-> If no, (in the example image, the filepath does not say anything with Apple) then proceed below:
In RStudio, navigate to: Tools > Global Options > Git/SVN.
Does the “Git executable” filepath match what the url in Terminal says?
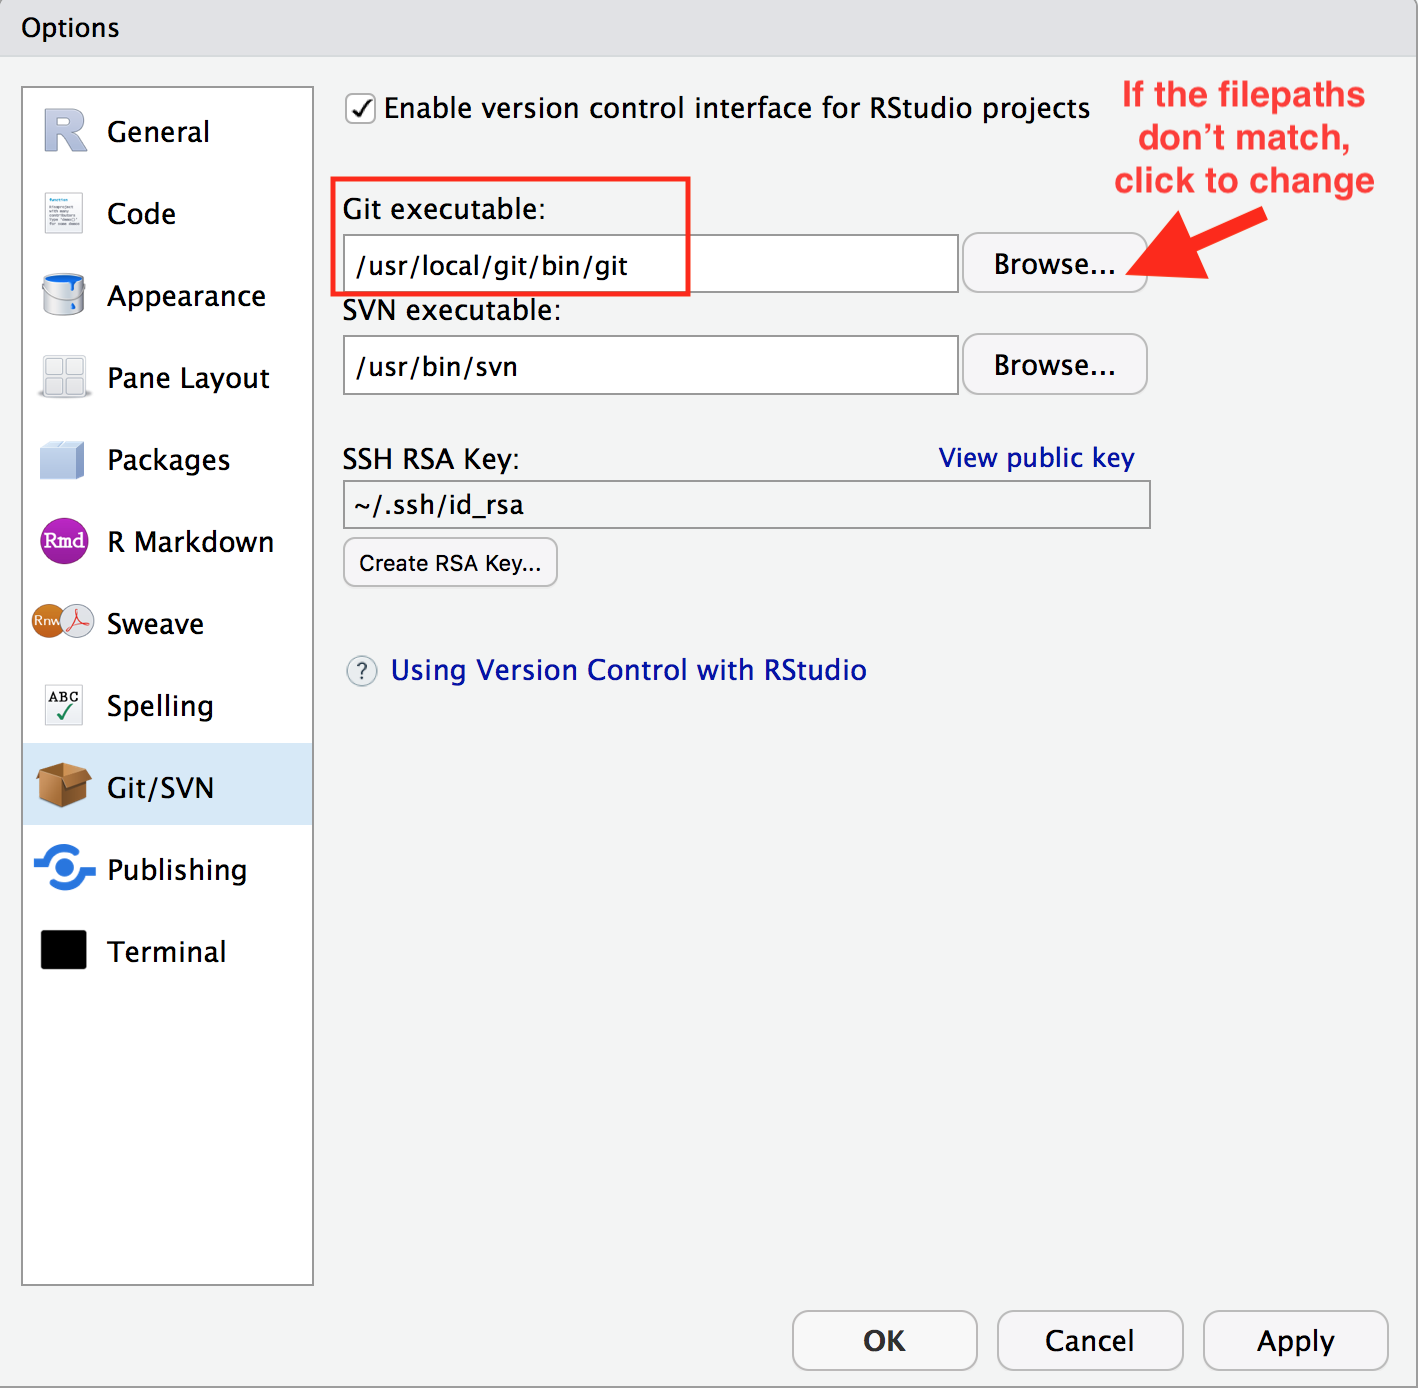
If not, click the browse button and navigate there.
Note: on my laptop, even though I navigated to /usr/local/bin/git, it then automatically redirect because /usr/local/bin/git was an alias on my computer. That is fine. Click OK.
Quit RStudio.
Then relaunch RStudio.
Try syncing or cloning, and if that works and then you don’t need to worry about typing into the Terminal, you’re all done!
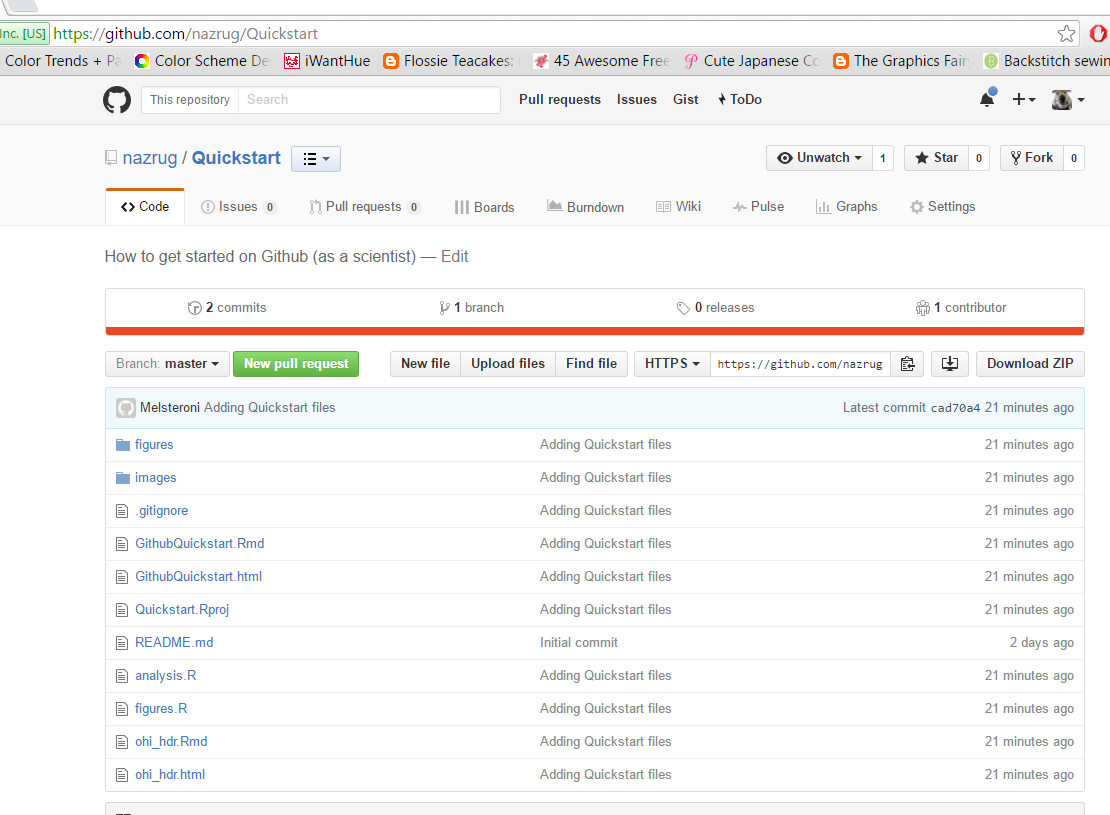
4.5.3 Create a repository on Github.com
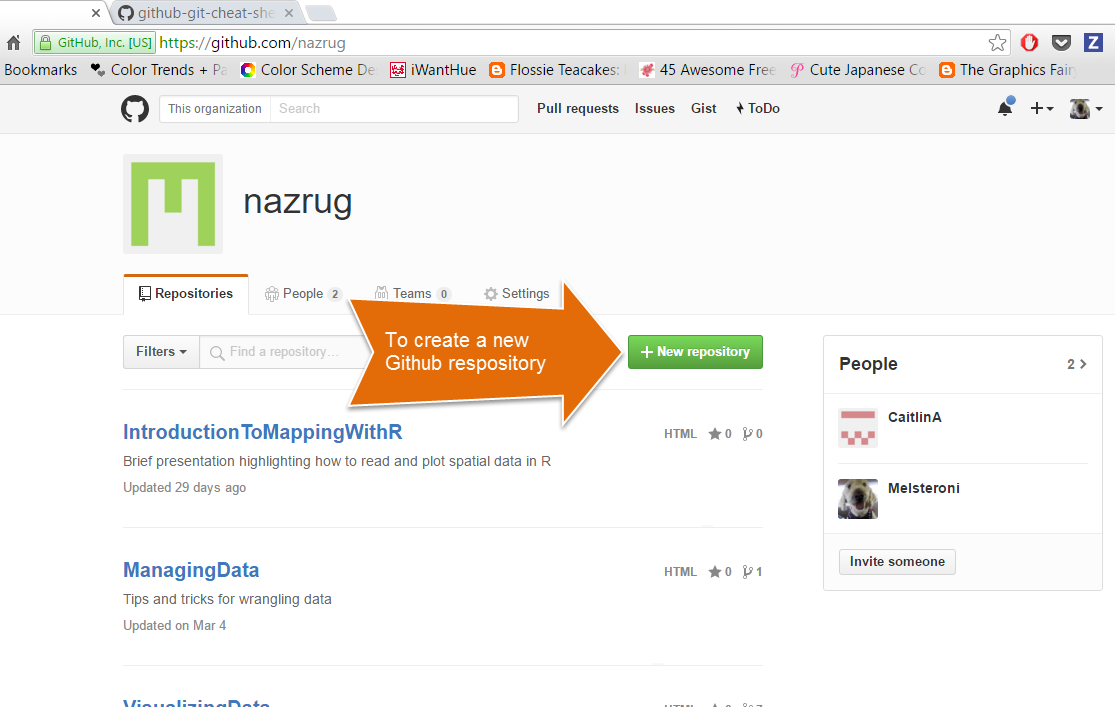
First, go to your account on github.com and click “New repository”.
Choose a name. Call it whatever you want (the shorter the better), or follow me for convenience. I will call mine quickstart.
Also, add a description, make it public, create a README file, and create your repo!
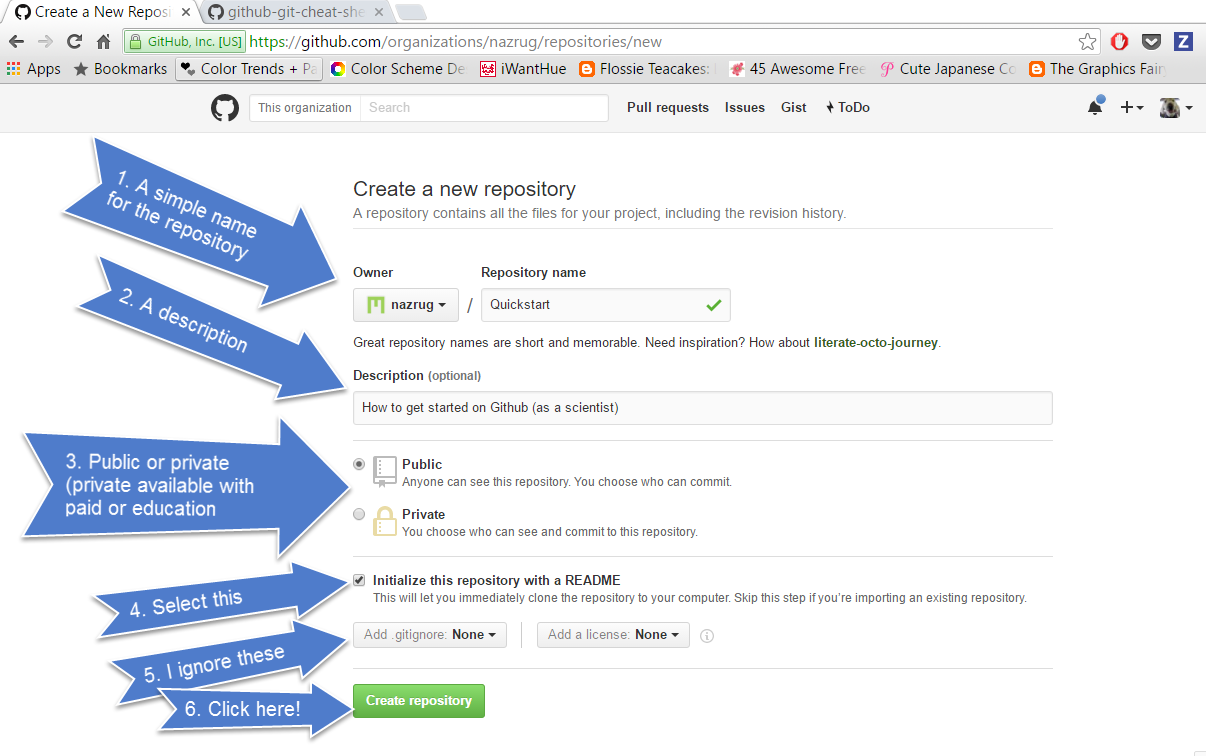
The Add gitignore option adds a document where you can identify files or file-types you want Github to ignore. These files will stay in on the local Github folder (the one on your computer), but will not be uploaded onto the web version of Github.
The Add a license option adds a license that describes how other people can use your Github files (e.g., open source, but no one can profit from them, etc.). We won’t worry about this today.
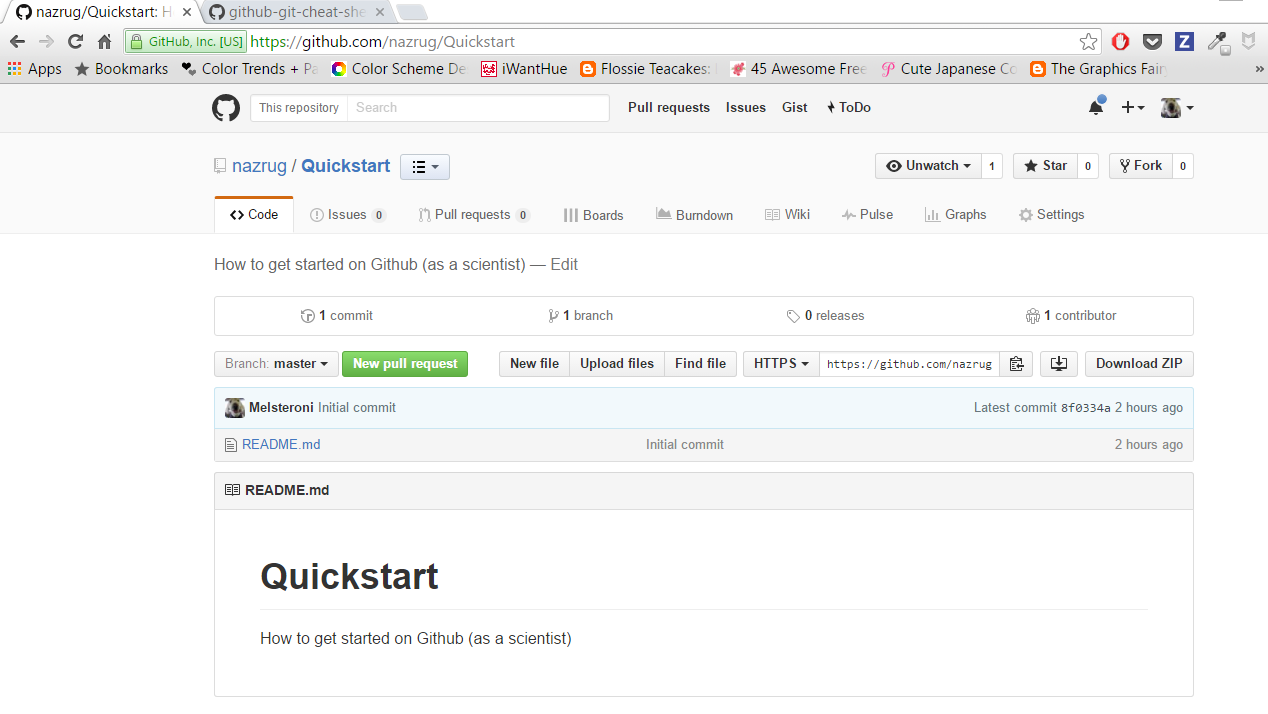
Check out our new repository!
Notice how the README.md file we created is automatically displayed at the bottom. The .md means that it is Markdown (remember how .Rmd was RMarkdown?) so the formatting we learned in the last lesson apply here.
From here, you will work locally (on your computer).
4.5.4 Clone your repository using RStudio
We are going to be cloning a copy of our remote repository on Github.com to our local computers. Unlike downloading, cloning keeps all the version control and user information bundled with the files.
Step 0: Create your github folder
This is really important! We need to be organized and deliberate about where we want to keep all of our GitHub repositories (since this is the first of many in your career).
Let’s all make a folder called github (all lowercase!) in our home directories. So it will look like this:
- Windows:
Users\[User]\Documents\github\ - Mac:
Users/[User]/github/
This will let us take advantage of something that is really key about GitHub.com: cloned repositories are saved as folders that you can navigate on your computer. The greatness of this will be evident soon.
So really. Make sure that you have an all-lowercase folder called github in your home directory!!
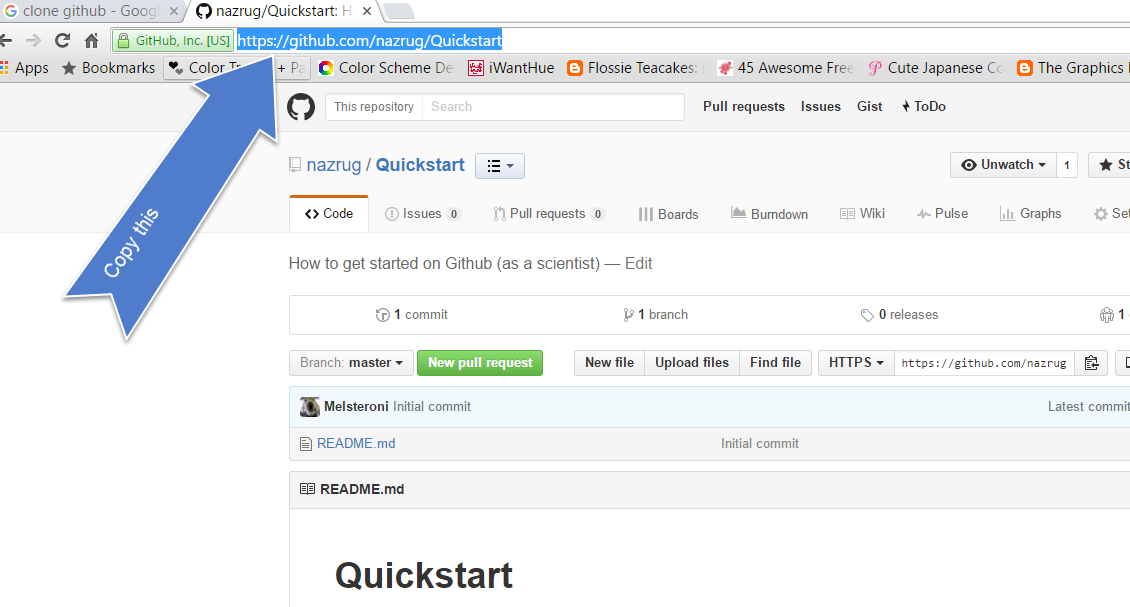
Step 1: Copy the web address of the repository you want to clone.
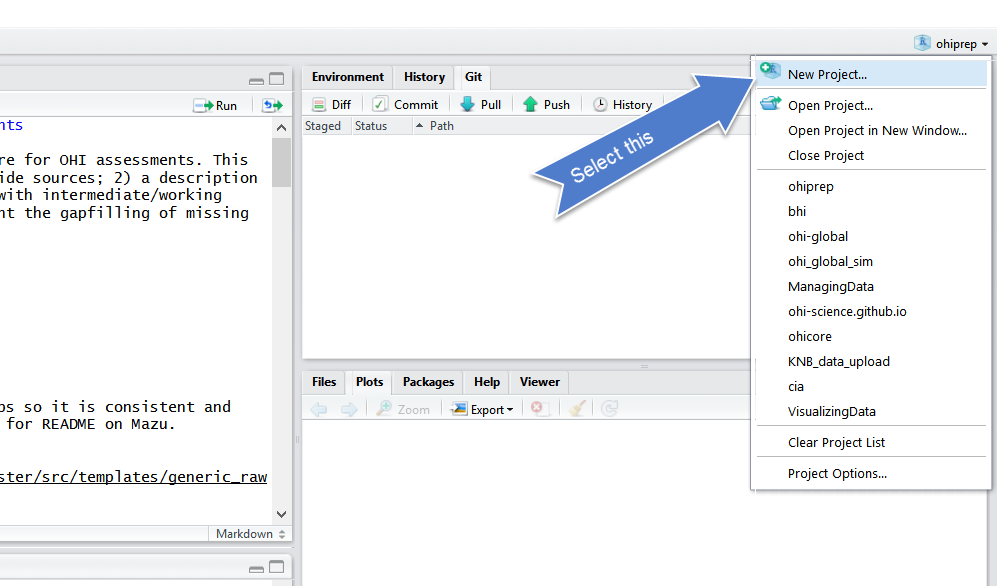
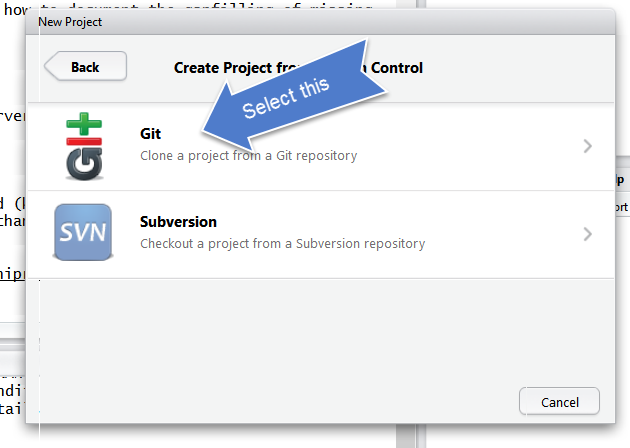
Step 2: from RStudio, go to New Project (also in the File menu).
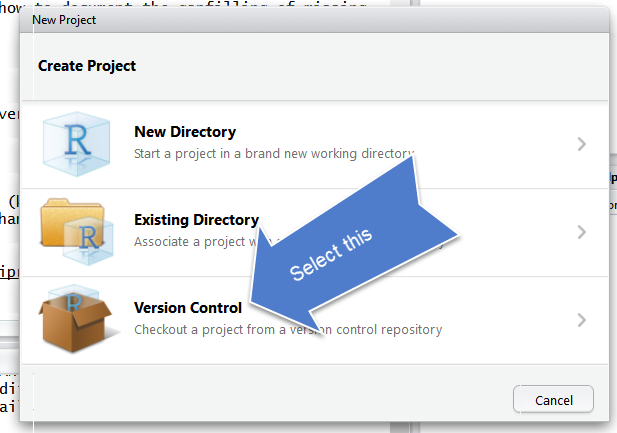
Step 3: Select Version Control
Step 4: Select Git
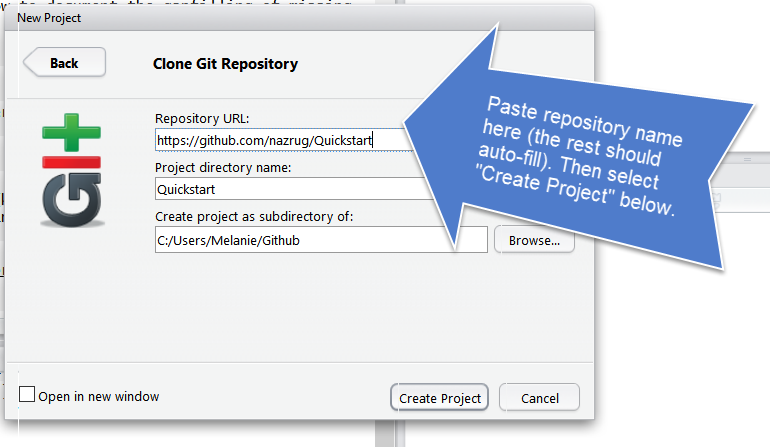
Step 5: Paste it in the Repository URL field, and type tab to autofill the Project Directory name. Make sure you keep the Project Directory Name THE SAME as the repository name from the URL.
Save it in your github folder (click on Browse) to do this.
4.5.5 Inspect results
If everything went well, the repository will be added to the list located here:
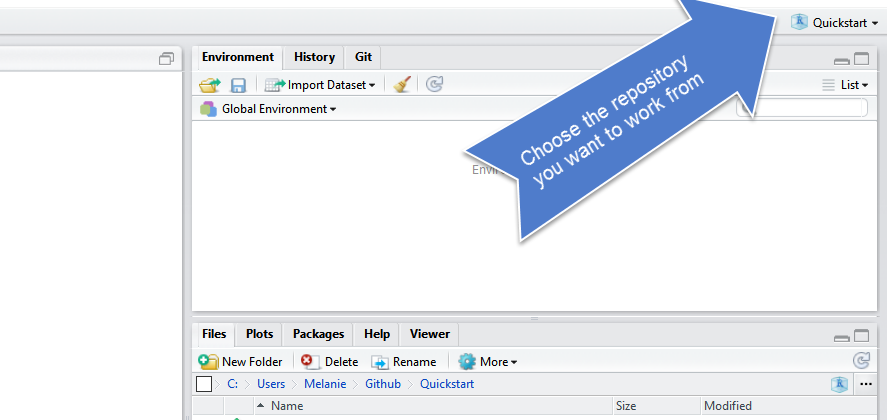
when we cloned this from RStudio, it created an RStudio project, which you can tell because:
- our working directory is set to `~/github/Quickstart`
- there's an `.RProj` file in the "Files" tab
- the project is named in the top right hand corner
- we have a git tab! This is how we will interface with Github.com
When you first clone a repo through RStudio, RStudio will add an .Rproj file to your repo folder. If you didn’t add a .gitignore file when you originally created the repo on GitHub.com, RStudio will also add this for you. These will show up with little yellow ? icons in your git tab. This is GitHub’s way of saying: “ooohh…..something changed in the repository”. In this case, when you click the box to stage them, they will turn into As because they have been added to the repo.
And the repository will be saved to the Github folder on your computer:
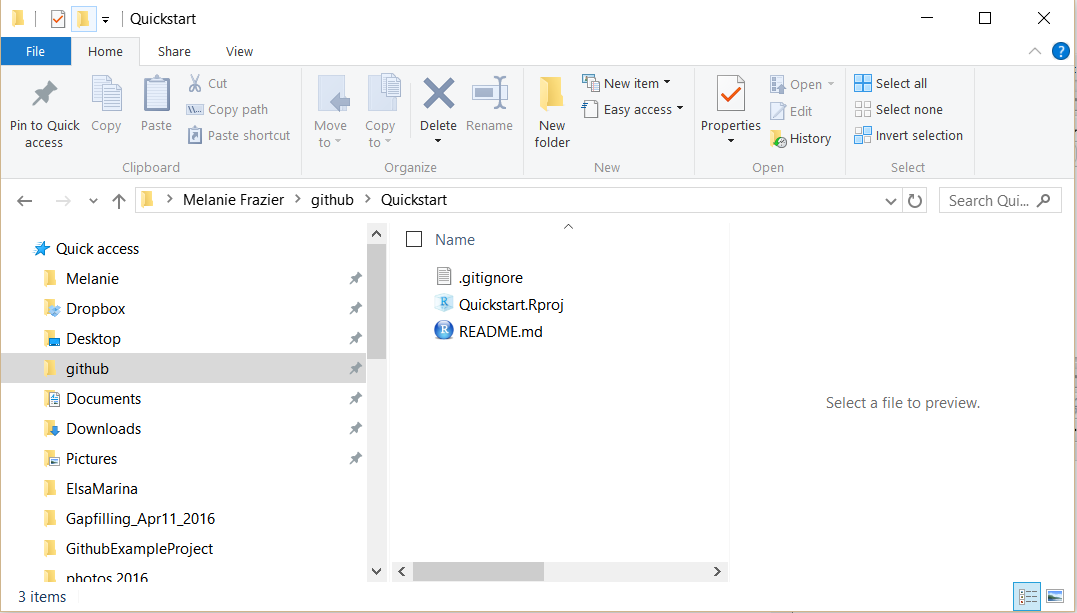
Ta da!!!! The folder doesn’t contain much of interest, but we are going to change that.
4.5.6 Add files to our local repo
The repository will contain:
- .gitignore file
- README.md
- Rproj
And, I typically create the following:
- folders for “data” and “figures”
- R scripts
- etc.
We can use the Git tab of RStudio to monitor changes to files in the local repository. When files change, RStudio uses the following codes to describe how the files have been modified:

We will demonstrate this by copying a file into the repository folder on my computer. This file will be added to the Git tab beside a green box with an “A”!
From this, you can see how the repository is being tracked, even when changes aren’t made through RStudio.
We can also make changes through RStudio!
4.5.7 Committing your changes and syncing with GitHub.com
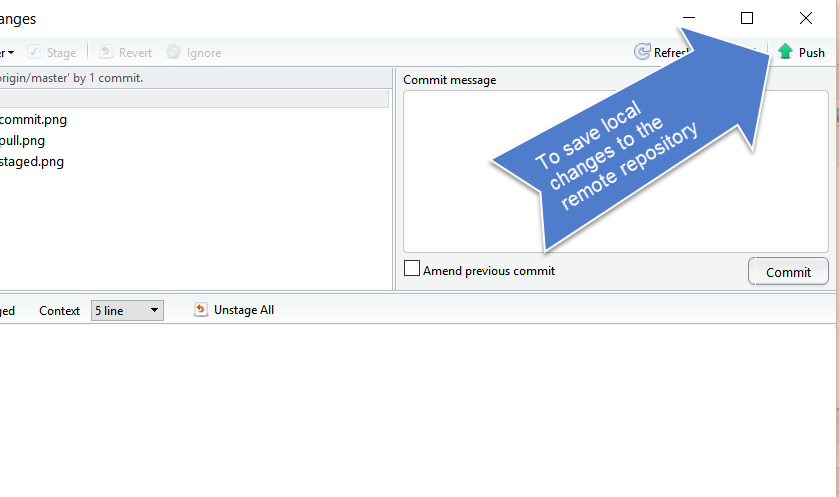
Eventually you will want to commit the files you have created in your local repository and then send them to GitHub.com
I tend to do this every time I finish a task (basically when I start getting nervous that I will lose my work). Once something is committed, it is very difficult to lose it.
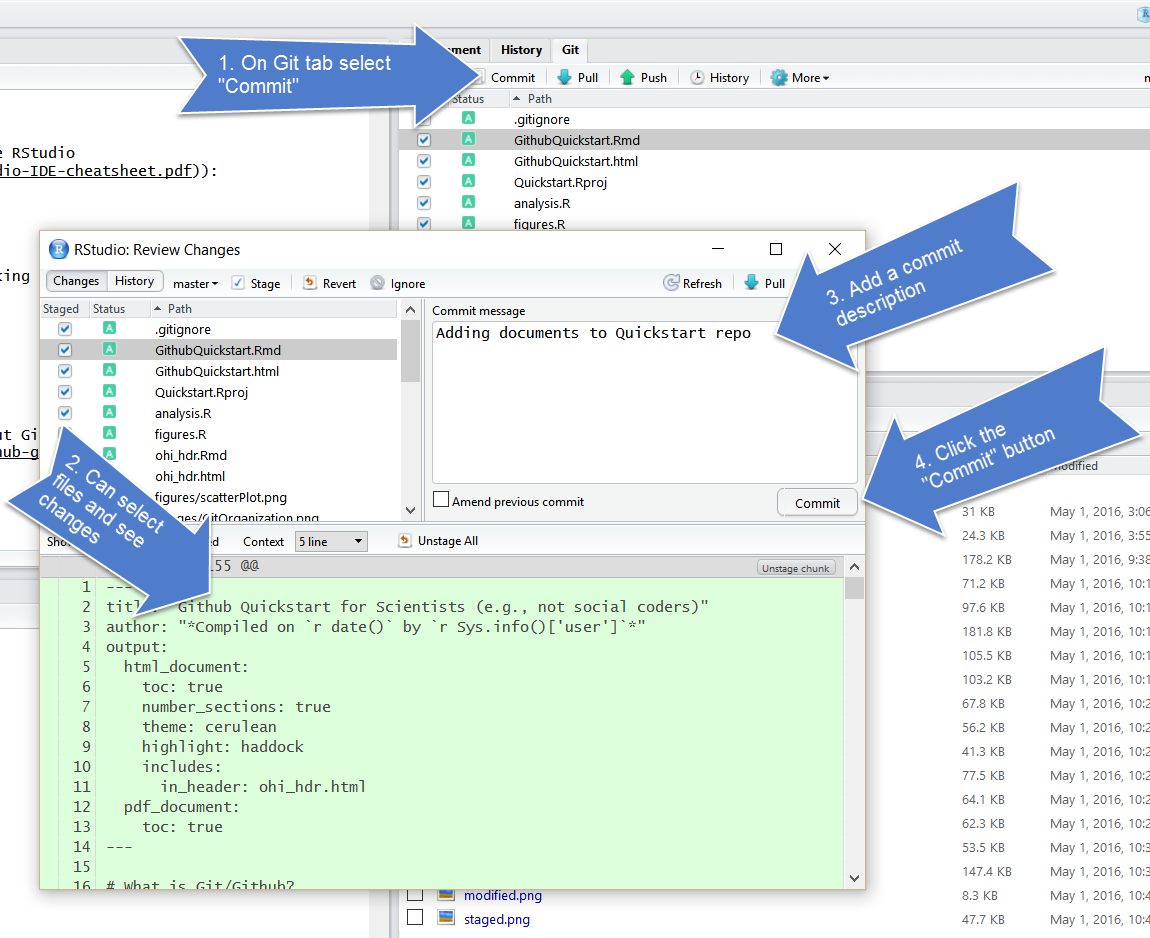
Committing saves the current saved version of your files to the official Git History. The commit includes all the staged files as well as a corresponding commit message (which you will write) and a unique identifier called a SHA ID. When you are ready to commit your changes, follow these steps:

We walk through this process below:
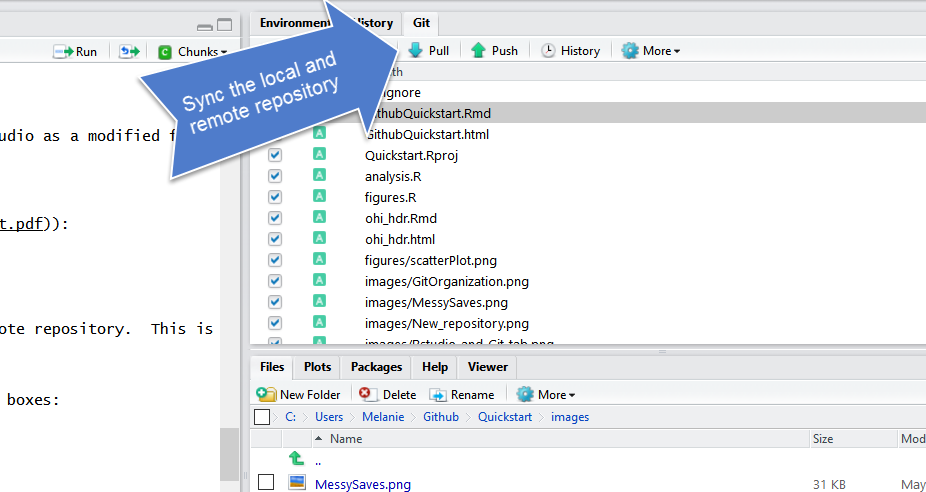
4.5.7.1 Pull
From the Git tab, “Pull” the repository. This makes sure your local repository is synced with the remote repository. This is very important if other people are making changes to the repository or if you are working from multiple computers.
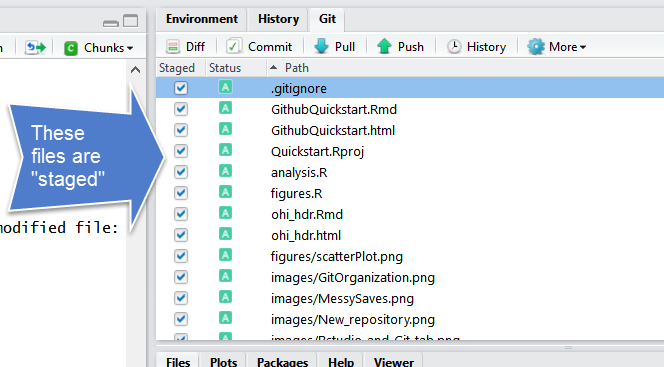
4.5.7.2 Stage
Stage the files you want to commit. In RStudio, this involves checking the “Staged” boxes:
4.6 Explore remote Github
The files you added should be on github.com:
Your turn!
This time let’s edit an existing file instead of adding something new. Open your README file by clicking on it in the Files pane (lower right corner). Write a few lines of text, save, and see what happens in your Git Tab. Sync it to your remote repository (Github.com).
Also, go to your Finder/Windows Explorer, and copy-paste something into your local GitHub repo. Then go back to RStudio and confirm that git tracked it. Remember, git will track anything within that folder (the way Dropbox does), it’s not specific to RStudio!
4.7 Going back in time
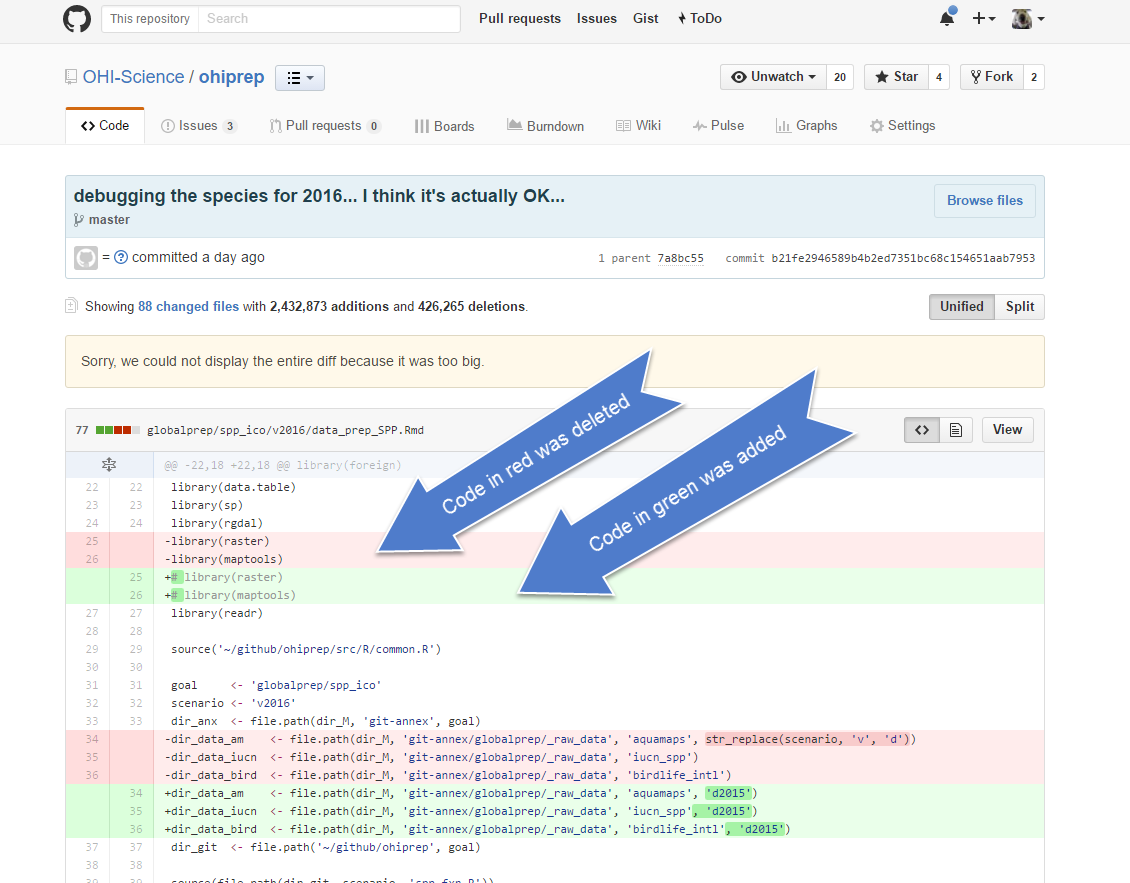
One thing that I love about about Github is that it is easy to see how files have changed over time. Usually I compare commits through github.com:
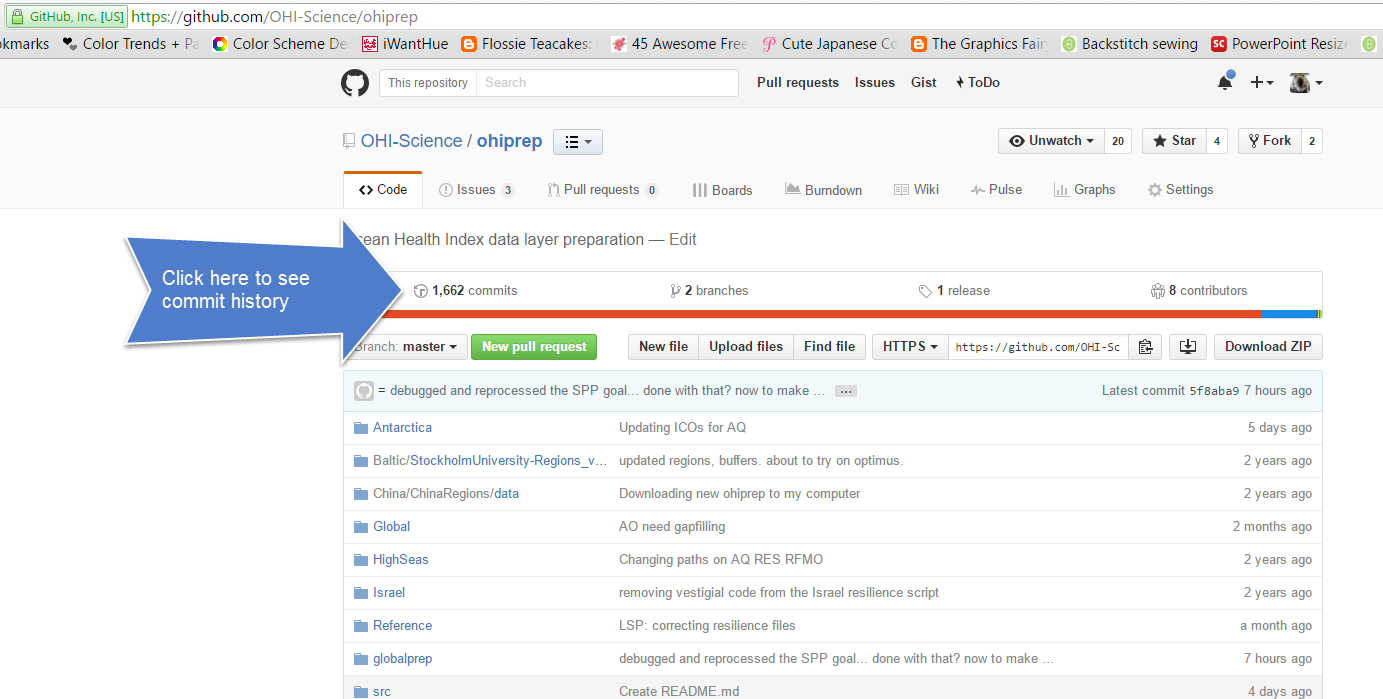
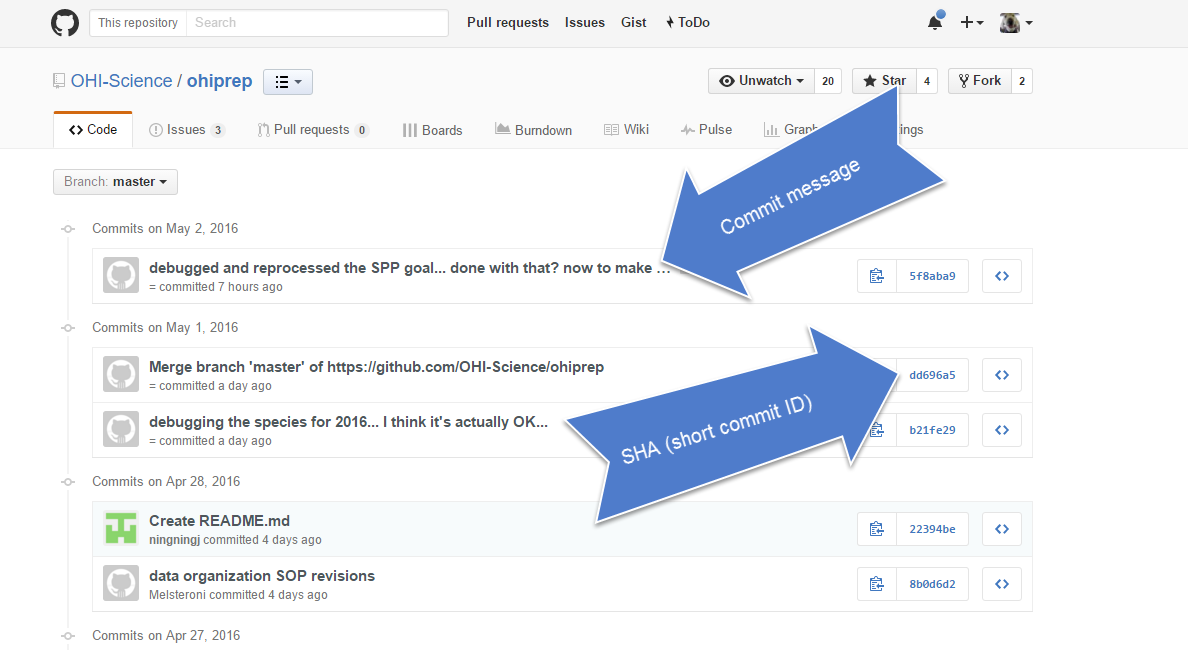
You can click on the commits to see how the files changed from the previous commit:
4.8 Happy Git with R
If you have problems, we’ll help you out using Jenny Bryan’s HappyGitWithR, particularly the sections on Detect Git from RStudio and RStudio, Git, GitHub Hell (troubleshooting). So as we are coming around, have a look at it and see if you can help troubleshoot too!
4.9 Growing the Tree - Branching and merging
Sometimes you want to maintain a stable, well-tested version of the repository, that can be made public without embarresment or lots of emails complaining that your latest addition broke everything. At the same time, you still want to add new features and test bug fixes with collaborators.
The way to do this is with branches. In MathMarEcol, we use branches to reduce the risk of doing something very bad to the common repositories.
Each branch is a parallel version of the codebase.
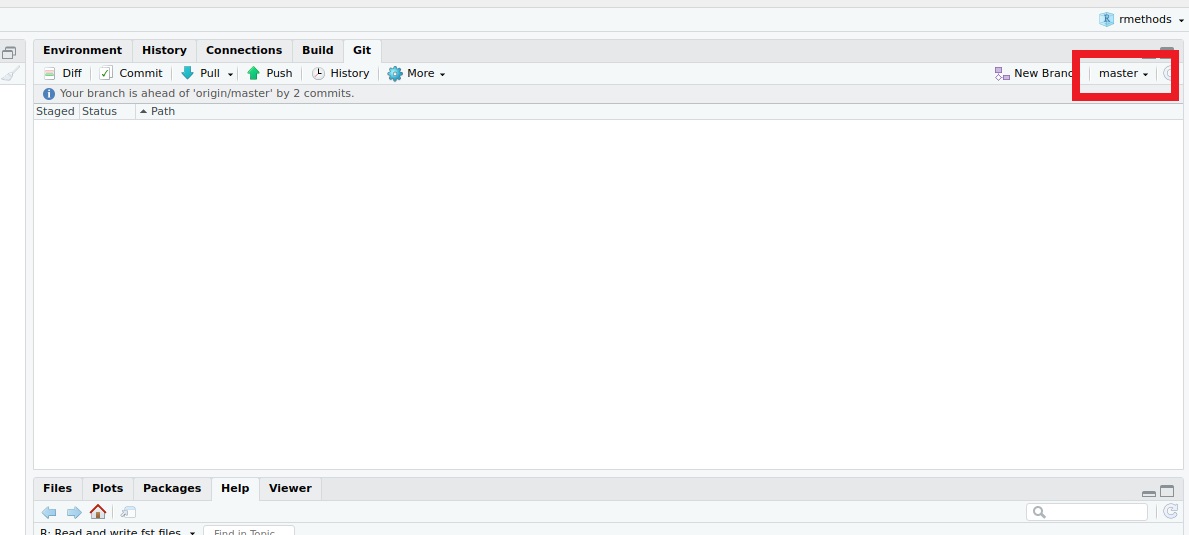
4.9.2 Use a branch
Once you have created a branch or checked out a branch made by someone else, edit and commit just as before.
The difference is that changes you make in the branch don’t change master, and any changes to master will not affect your files while you are in the branch.
4.9.3 Put changes into master
When you are ready to put the changes into master, you push your branch to GitHub and submit a pull requst.
Make sure you have the most up to date version of your branch by pulling, and make sure there are no merge conflicts. Then push your branch to Github as usual.
Next, you make a pull request by going into GitHub, selecting your branch, and clicking “New pull request”, next to the branch button.
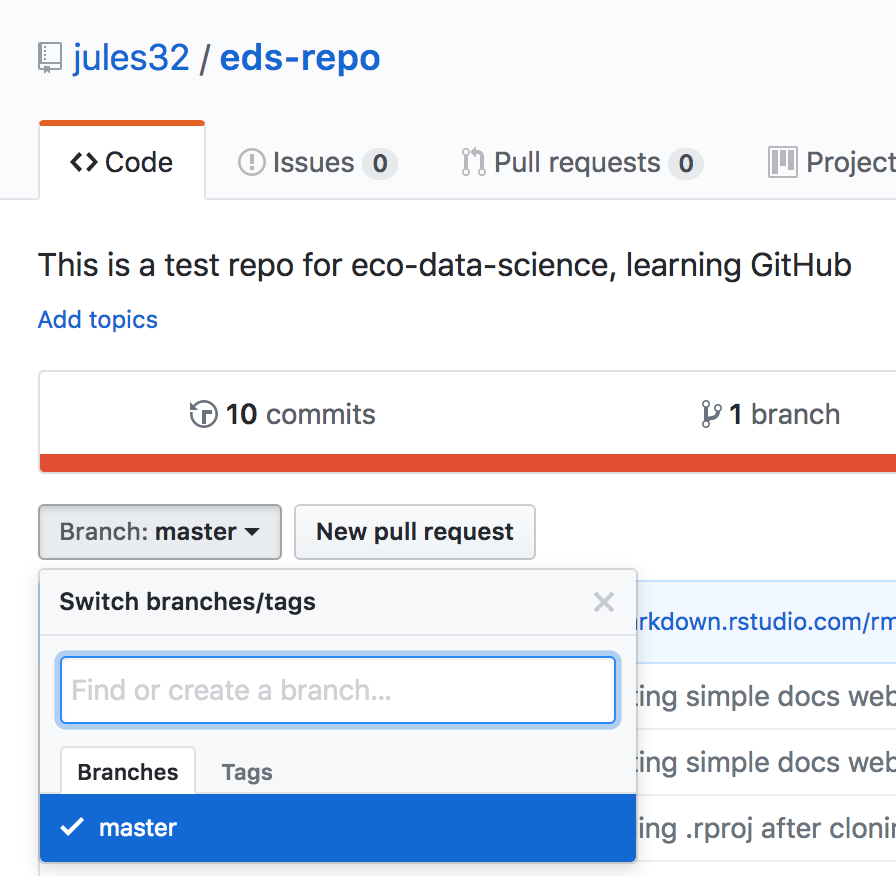
The pull request is very similar to a Github issue, but the outcome is modifications to the master branch.